Shooting MotoGP


By Dave Wild
Photos by Dave Wild


June’s MotoGP in Donington, UK started with horrible grey skies and lots of rain. I was prepared for the weather but I hadn’t done my homework with regard to taking photos. I was starting with just a few thoughts on what to expect but I experimented throughout the day and discovered what worked and what didn’t.

In general, the bikes move very fast so you’re going to need a fast shutter speed to capture them without blur. When you look at motorsport photographs, the photos tend to be either

  • very sharp photographs
  • photos where the subject is sharply in focus and the background is blurred
  • and sometimes where the photographer has the main subject blurred to accentuate the speed


Of these three types, I find the first type the easiest. Using a very fast shutter speed you can get a good clear focused shot of a fast moving object. Some people advocate pre-focusing where you think your subject is going to be, but with Moto GP where the bikes are nearing 200 Mph, that was too difficult to get good results for me.

What I found to be easier was to set my camera’s focusing mode to continuous so that I cold focus on a bike by holding down the shutter release half-way and track the bike around the track until it was where I wanted it to be then press the shutter release the rest of the way to capture the scene.

Review Your Shots with Zoom - Upon first inspection, my first few shots taken like this looked pretty good on the LCD screen and I took a few more. When I used the camera to review the image and zoom in though it was obvious that the subject wasn’t that sharp really. So for the next few shots I’d take a few with a faster shutter speed and then review them on the LCD, zooming in as far as possible to see how sharp the image is. Making the shutter speed faster and faster until I was happy with the sharpness. If I didn’t review the images by zooming in to check them I could have got home with a lot of blurry shots.

My day at the Moto GP was a very gloomy one weather wise, and I had to increase the ISO setting in order to get enough light for the very fast shutter speeds being used. Bear in mind that if you are zooming in a lot, your aperture will shrink and less light will be entering the camera. At a Moto GP it’s likely that you’ll be far enough away from the bikes to make using a zoom lens a necessity.

Shooting Through Fences - It’s likely that you’ll be separated from the track by a safety fence - these are typically mesh fences to allow spectators to see the race but you look at them at just think that they’re going to ruin your chances of getting some good photos.

The first photo here shows the fence that was between me and the track and the second one shows a photograph zoomed in of a bike on the track.

I was pleasantly surprised to find that not only could I zoom in quite clearly on the bikes behind the fence, I could track them without the fence mesh getting in the way and ruining the shots. Sometimes, mainly between bikes when I was trying to pick up a new one, I would suddenly get the lens to try and focus on the fence, but this happened infrequently. This is really handy because it means you’re not restricted to getting right to the front and popping your lens through the mesh!

Incorporating Blur - After getting shots that were very fast shutter speeds that were sharp, I had a go at getting some where I tracked the bike with a slightly slower shutter speed in an attempt to get the bike in focus but blur the background slightly to get a sense of movement. These shots were much harder to get right - especially as I was holding the camera by hand. This final photograph is one taken using this method - you can tell that the shutters speed is a bit slower because the spokes inside the wheels are blurred and so is the background. Compare this with the very first shot where you can clearly see the spokes within the wheel and even the holes on the brake disc.

I think this blurred-movement method would be made much easier with a monopod or a tripod. Due to being in a crowd, a monopod is probably more acceptable to keep your fellow spectators happy.

Shooting the Tube

An Idiot's Guide to Surf Photography
By David Pu'u


“This is my friend David. He is a surf photographer.”

Richard cocked his head and smiled graciously. I felt compelled to explain. “Well I do shoot some surfing, but that is actually the smallest percentage of imagery in my library of work. Yes, I am a senior photographer with several surfing magazines, but…” My words trailed off, and then it hit me. I always feel like I have been introduced as the village idiot when someone starts off an introduction by describing me as a “Surf Photographer.” An apology of sorts seems to want to always spring to my lips. There are several reasons for this. All of them pertain to the following list of line items popularly thought to be peculiar to the genre of individuals typically described as “Surf Photographers.”

1. They own vast amounts of expensive equipment.

2. They travel a lot.

3. They follow the Jeff Spicoli character from Fast Times at Ridgemont High around, waiting for him to do something great so that they can make the approximate 100 dollars per page that the average surf publication pays.

4. They have little real income as a result of their avocation, so are either supported by parents/trust funds, work other jobs, or live in their cars, which are generally old Seventies-era Detroit-issue clunkers.

It is easy to spot the contradictions in the above line items. So what then is reality, should one want to become a “Surf Photographer?” Below is the real list of items one must acquire to get one’s feet wet in the game.

1. You have got to have game. That means a complete understanding of the language of photography, surfing, surf history, weather, swell and weather forecasting, and know all the players in the surf industry worldwide. You must be physically very fit and able to put your body and camera where surfers go, as Point-Of-View (“POV” for short) imagery is generally the most compelling. So you need to be very comfortable in demanding and often harrowing ocean conditions. Obviously, game takes a while to acquire.

2. You need a camera package. Mine costs upwards of $40,000 and much of the water equipment is custom-designed by me and built by an eccentric guy in Santa Ana, California.

3. You need to be digitally and computer literate. My computer system consists of two high-end Macs and one PC and an external raid storage system ($10,000) and about $15,000 worth of programs and numerous classes hosted by my agency, Corbis Images, on how to use it all properly.

4. You will need the art sensibility of a person possessing a Masters of Fine Arts in order to properly interpret an athletic subject in a manner different from the cadre of other highly skilled and talented individuals you will come to know as your colleagues.

5. You will need the business management and marketing skills of both a corporate CFO and CEO to manage your work and market to the 40-odd publications that exist for surfing in the global market. Because you will need every $100 page you can get each publication period just to maintain forward momentum.

6. You will need to have an unbounded enthusiasm and love for the ocean and people who live in and around it that call themselves surfers.

However, should the above line-item list prove unrealistic or emotionally and financially too unpalatable for you -- it should -- just keep your day job. Get a disposable water camera, make a few great images of your pals, and go surfing.

I think that how it all manages to work was best summed up down in Hollywood one day as I auditioned to be the unit photographer for a motion picture. A calm, nice fellow introduced to me only as “Tim” looked over my book of images, some of which happened to be ocean- and surf-themed.

After a quick but detailed look at my work, he simply said, “I would love for you to shoot my movie.” “Your movie?” I asked. “Yep,” he replied. “I am the director, and if you can shoot surfing you are more than qualified to shoot anything we will need.” Tim was a surfer.


Fill Flash and Sports Photography


Photo: Rick Clemson


From N.K. Guy, Photonotes

Flash photography takes on two very basic forms. In regular flash photography, the flash is the primary light source for the photo. Flash metering is done for the foreground subject, and the background is metered by the camera’s regular exposure metering system. This can lead to the background being underexposed and dark if ambient light conditions are low. This is how most people think of flash - as a way of taking photos in dark places.

However, flash can also be used in bright locations or in daylight to lighten shadows, reduce the harsh contrast of full sunlight or brighten up dull images without being the primary light source for the photo. This is called “fill flash” or “fill-in flash,” though the latter term’s more commonly used in the UK. And it’s often a source of surprise for non-photographers, who don’t expect to see photographers using flash units outdoors on sunny days in brightly lit settings. In such situations the fill flash is being used as a sort of portable reflector - shining a little extra light in certain areas.

A typical example might be a person who’s wearing a hat outdoors on a sunny day. Hat brims often cast dark shadows over the subject’s face, and a little flash can lighten up this shadow nicely. A backlit subject is another common use for fill flash - you can’t simply crank up the exposure compensation to expose the subject correctly as then the background lighting would be too strong. Or perhaps you want a little sparkle of light reflecting back from a person’s eyes - the “catchlight.” Sometimes wildlife photographers use flash units at great distances from their quarry for the same reason - they aren’t using the flash to illuminate the animal but to provide a lively catchlight to the eyes.

In all these cases you are, from the point of view of the camera, using two light sources at the same time. There’s ambient lighting, which is all the available light around you - reflected light from the sun or artificial light sources. And there’s the light from the flash unit, which is supplementing this existing light. As always, ambient light levels hitting the film or sensor are governed by the lens aperture and shutter speed and flash levels are governed by flash metering. By adjusting the output of the flash unit you’re essentially adjusting the ratio between flash-illuminated and ambient light-illuminated scene.

In fact you could argue that the two cases present above - flash as primary light source and ambient light as primary light source - are an artificial distinction and that all flash photography is fill photography in a sense; just that in the first case the ambient lighting is so low as to be insignificant, whereas in the second case it’s the reverse. This is true enough, but the distinction is useful to make, particularly in terms of the way full auto and P modes work versus Tv, Av and M modes.

Unlike certain other camera systems (particularly Nikon), Canon EOS cameras always default to fill flash mode when the camera is in Tv, Av and M modes. They also perform fill flash in P mode if ambient light levels are high enough. There’s no separate switch or pushbutton to engage fill flash. For details have a look at the section on EOS flash photography confusion below.

Fill flash Ratios
The “fill flash ratio” is commonly described in terms of the ratio of ambient light plus fill flash combined, compared to the fill flash alone. Canon EOS gear, however, usually lets you adjust the fill flash in terms of stops of flash output, in either 1/2 or 1/3 stop increments. What’s the relationship between the two ways of describing fill flash?

* A ratio of 1:1 would mean that the flash unit is the sole source of light (0 ambient + 1 flash) and therefore you wouldn’t have a fill flash situation.

* A 2:1 ratio would mean that the ambient light and flash are at the same level (1 ambient + 1 flash). That basically means 0 stops of compensation given a fairly flat-lit scene, and usually results in rather unnatural looking fill flash.

* A ratio of 3:1 means that there is twice as much light from the ambient source as the flash (2x ambient plus 1 of flash). Such a ratio requires a -1 stop fill flash setting on the flash unit, since each stop means a doubling or halving of the amount of light.

* A ratio of 5:1 means that there is four times as much light from the ambient source as the flash (4x ambient plus 1 of flash). This is a -2 stop difference. Typically photographers use between 1 and 2 stops of fill flash to lighten shadows without creating a phoney flash-illuminated look.

However, the term “ratio” is confusing and seems to mean different things to different people. Sometimes people talk about a 1:1 ratio when the ambient and fill lights are of equal intensity. So a 2:1 ratio might mean -1 stop fill flash and 4:1 would mean -2 stop fill flash. In this case they’re talking more about the light output than they are about the reflected light.

The concept of ratios works well in studio situations where you have total control over the lighting. You can turn off the main light and measure the fill lighting with a meter, you can move lights around to vary their strength, etc. But if you’re taking a candid photo outdoors you have no such control. You can hardly turn off the sun, and automated TTL flash is going to have its own ideas as to what constitutes correct lighting.

Cheap, Dramatic Lighting


Dramatic Lighting - The funniest bloopers are right here

Favorite Faces

Black and white incubates structure and texture, it forces my eye away from the beautiful persuasion of chrominance.


Protest

Go Rebels.


Issues

The Incidental Change


Jacob Riis, Mullens Alley c. 1888


Lewis Hines, Doffer Girl in New England, c. 1909


Dorothea Lange, Migrant Mother, c. 1936


Charles Moore, Birmingham, 1963


Eddie Adams, Viet Cong Guerrilla Execution, 1968


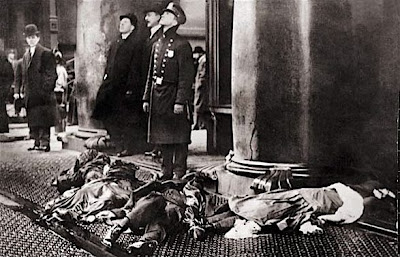
Triangle Shirtwaist Company Fire, 1911


John Paul Filo, Kent State, 1970


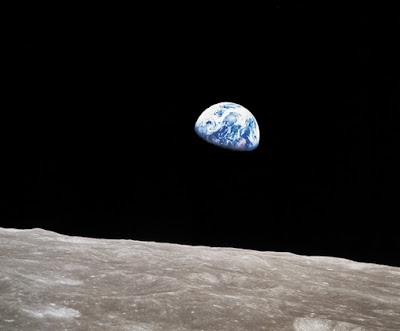
William Anderson, Earthrise, 1968


Larry Burrows, South of the DMZ, 1962


Stuart Franklin, Tiananmen Square, 1989